How I use Anki: expanding the scope of SRS
Intro to this post
So maybe you’ve heard about spaced repetition, and you’re familiar with the basic ideas for why it can be highly beneficial for learning. But despite this, you don’t really use it all that much / at all, maybe because you find it kinda boring, or you don’t think the things that you are trying to learn are suitable for spaced repetition. Even though there’s a bunch of meta-level advice floating around sites like LessWrong, there doesn’t seem to be as much on the object-level—i.e. how to actually implement spaced repetition in a way that fits with your learning style—and you’re not sure how to go about doing this.
This is basically the position I was in at the start of this year. But since then, I’ve started using it a lot more than I used to, in the form of the spaced repetition software Anki. I’ve realised that the customisability Anki offers allows you to greatly expand the scope of things SRS is traditionally used for, to encompass many different fields and types of knowledge. Hence, this post should be seen as an attempt to combat the problem outlined above, and give specific object-level advice about how to make Anki work for you.
Before I get into the main body of this post, I should add a caveat here. It’s understandable why object-level advice seems undersupplied relative to meta-level, because the latter can be relevant to everyone, whereas the effectiveness of the former often varies a lot from person to person. As such, this post should be read with a great big dose of YMMV. I expect a large group of people will probably get very little value out of it. However, if a couple of people find it extremely helpful for setting up / improving their own spaced repetition systems, I will consider it having been worth writing!
Another caveat—maybe the most valid criticism of Anki is that it’s great for discrete memorisation, less so for linking ideas together. I totally agree with this, and I think there are some great posts on LessWrong like this one about how you can build systems to help you synthesise knowledge. I’m a big believer in PKM software like Obsidian which is built on the ideas of bidirectional links and knowledge graphs. I believe Anki can and should be complimentary to these kinds of systems, rather than replacing them.
Depending on why you’re reading this, you might find different parts of this post more relevant than others, so I encourage you to jump around. A quick summary of the different sections:
Quick intro to spaced repetition describes the core ideas behind spaced repetition and SRS. I expect this to already be familiar to most LessWrong readers, so feel free to skip this section if you already use spaced repetition, or you understand the main ideas behind it.
Why I use SRS & Anki provides a brief history of my use of SRS, and how it evolved over time. This is a short section, designed to lay the groundwork for the next one.
Specific ways I’ve used Anki is the main section of this post. This is where I describe particular types of knowledge I wanted to create Anki cards for, or features I’ve created for my cards. I’ve included images, so you can just scroll through it and stop on anything that looks interesting to you.
How you can customise Anki cards gives a summary of how I was able to produce the card types in the previous section. I expect this to be most useful to coders who have read the previous section and decided they want to try and customise their own cards (although non-coders might find it interesting too).
Retrospective: what were the most and least successful Anki uses? tries to analyse the different Anki features I’ve created, and which ones were the most worthwhile in terms of use I’ve got from them vs time they took to implement. It’s my attempt to 80⁄20 the lessons I’ve learned from this process.
Lessons I hope people take from this summarises what I see as the key high-level points of this post.
If you’re also an SRS user, feel free to comment in the chat describing what your workflow looks like, and whether you’ve created any features to improve your learning. I look forward to hearing from you!
Quick intro to spaced repetition
I’m going to keep this section short, for two reasons:
I’m expecting that the average reader is already pretty familiar with the basic ideas behind spaced repetition,
There are already some great intros for spaced repetition and SRS, for instance:
Lessons I’ve Learned from Self-Teaching is a great post by TurnTrout on self-teaching in general, which discusses Anki and SRS in the first section
My Anki patterns by agentydragon is really useful for specific Anki tips
Twenty rules of formulating knowledge gives lots of recommendations for how to balance learning and memorisation, and the kinds of things you should try and memorise (e.g. the importance of understanding before memorisation, and keeping flashcards simple and specific)
The one concept that needs to be covered before any discussion of spaced repetition is the forgetting curve. Essentially, it shows how peoples’ recollection of facts decays approximately exponentially over time, after initial learning. This was observed by a researcher called Hermann Ebbinghaus. He went on to suggest a few two methods for increasing the strength of memory. The most important ones for our purposes are active recall and spaced repetition.
Active recall is when recalling a particular fact involves some active effort (in contrast to passive recall, e.g. reading a book or watching a video). We’ve all been in the situation where you’ve been reading a textbook for an hour, only to finish and realise that nothing you read actually sunk in, and if you try and remember specific details from the book you come up short.
Spaced repetition is the act of spacing out the testing of facts based on their difficulty. The newer the fact / more difficult it is to remember, the more frequently it will be shown. This is traditionally done with flashcards, although now spaced repetition software (SRS) is a common choice, because it automates the process of spacing out cards.
To understand why spaced repetition works, we need to go back to the forgetting curve. As the diagram below shows, if you review the material at a later point, you can increase your retention back up to 100%, and it will now decay slower. It’s very important that your review is a form of active recall, because it’s the act of successfully retrieving information (rather than just reading it) that seems to be responsible for the slower rate of decay.
As the graph suggests, the more you review something, the more time you can leave between subsequent reviews. SRS automates this process, usually with a set of buttons that you can press to indicate how easy the material was to recall (where a failure to recall usually results in the process being reset from the “first learned” point).
Why I use SRS & Anki
I started using SRS in high school, when I was learning Chinese. Learning a language is one of the most well-known applications of spaced repetition, and it was the only thing I used it for in high school (even though in hindsight I think I would have benefitted from using it to study for my other exams).
In my first year studying maths at university, I got pretty overwhelmed with the sheer amount of content. It was a completely different order of difficulty to high school. Previously, I just had to memorise a few simple formulas and know when to apply them, but here I had to understand quite deep areas of mathematics, and very quickly recall key concepts and methods for solving different problems. I tried to use SRS for maths revision by writing flashcards by hand, and taking photos of them to act as the back and front of my Anki cards. Unfortunately, this didn’t work very well for me, because my flashcards were less “short question on the front, short answer on the back”, and more “short prompt on the front, very densely packed formulas and theorems on the back”. In other words, there was too much information for each card to correspond to a single flashcard in Anki. So I shelved SRS for maths, and kept using it just for Chinese.
It was only towards the end of my third year that I found a system that worked for me. As I’ll describe in the “occlusion cards” section below, I realised that by taking photos or screenshots of notes and then digitally covering up certain parts of them, I could create much more suitable flashcards. For instance, I could have a flashcard for a proof, and cover up one key variable substitution or other trick that was crucial for constructing the proof as a whole.
I’m currently in my fourth year, and I’ve expanded spaced repetition to most of the things I currently learn—not just languages and maths, but also books I’m reading, programming libraries I’m learning, quotes I want to remember, etc. The next sections will describe how I’ve implemented these systems in Anki.
Specific ways I’ve used Anki
Anki is the most popular and well-known form of SRS, and it’s the one I’ll be talking about for the rest of this post. However, it’s important to mention that there are others, with different benefits (e.g. some PKM software like Obsidian have optional plugins for spaced repetition, and this might be preferable if you prefer having your flashcards and notes more closely integrated. There are a few reasons I prefer using Anki, but the main one is customisability—I can design very specific card templates to meet my needs. Anki provides basic templates, e.g. classic Front / Back cards (where you see a prompt on the front, and can flip the card to see the front and back together), or Cloze deletion cards (where you can type in a phrase, and choose certain words or phrases to hide, which will then be revealed when you flip over the card). However, Anki also gives you the ability to edit these templates, and write your own.
In the following subsections, I’ll discuss specific types of Anki cards I’ve designed, for different fields and types of knowledge. For a description of how I actually created these cards, please see the section How you can customise Anki cards (which is actually much easier than it looks!).
Hints
This is the simplest feature I added to cards (and was also one of my first, when I started playing around with card customisation). When you click on the blue box, the text you wrote in the “Hint” field is revealed. When you flip the card, the hint is also revealed (if it isn’t already). Hints are useful for bootstrapping cards you find difficult to remember, although in the equilibrium I usually aim to remember the card without the hint[1].
Occlusion cards
There is actually an image occlusion add-on, but I’ve found it preferable to design my own version of this card (partly because I get more control over it and so can add features like hints, partly because I find these occlusion cards slow to use). My version of creating an occlusion card is to take a screenshot using Windows snip, open the image on my computer, then draw over sections of the image. The front of my card is the obscured image; the back is the full image. This way, I can create a card every 20-30 seconds (and deciding which parts to occlude is a good form of revision in itself).
My main use-case for occlusion is for maths. I take scans of handwritten notes (or pdfs of digital notes), and occlude certain formulas or key steps in a theorem. I also colour-code each module, which helps me mentally distinguish between them.
Below is an example from information theory[2]. The notes were written on a ReMarkable tablet[3], and uploaded to my computer via the ReMarkable software.
Coding cards
Previously, I used occlusion cards for learning coding syntax, but I started realising it was quite passive, and sometimes I found myself daydreaming as I was going through cards. When it got to actual programming, I was often unable to remember certain functions or features, despite already having cards for them. This led to the idea of converting sections of code into Anki cards, and making certain segments of them into input fields. I can tab through the input fields and type in as many answers as I can remember, then when I flip the card they are marked as correct or incorrect by being coloured green or red.
I’m pretty confident in saying that this is my single favourite feature that I’ve designed for Anki cards. It’s a perfect use-case for Anki, and has allowed me to massively speed up my rate of learning new coding syntax. I should add the caveat that I don’t advocate memorising all code syntax (that’s what StackExchange is for!), but I still find these cards incredibly helpful.
The example below is from PyTorch (with some of the answers correct, some incorrect, and some left blank, for the purpose of illustration).
Spoiler cards
I got the idea from these when I saw them on LessWrong! The cards only have one field (content), and when the card loads, it turns any italicised text into a spoiler. When you hover over a spoiler, it reveals itself temporarily. When you left-click on a spoiler, it reveals itself permanently. That way you can go through a card point by point, in whichever order you want. One of my favourite use-cases for this is making quotes into cards, by just copying the quotes into the card and italicising parts of them.
Mostly, this is just a fancy Cloze card (although personally I prefer the aesthetic, plus you can click through them one by one in any order, which to my knowledge isn’t a feature that Cloze offers by default). However, one nice thing about designing the cards myself is that I’m able to easily mix and match features. For instance, some of my cards combine the usual Front/Back functionality with spoiler tags (i.e. when you flip the card the spoilers reveal themselves and the back of the card appears), just to keep things interesting!
Chess cards
While I was designing my new Anki cards, I wanted a way to empirically test how useful they were at improving my learning. I had the idea to create cards for chess, and see how quickly my ELO rating climbed as I used them. This was motivated by my perception that most people who are very good at chess seem to have played a large number of actual games, but studies of performance in chess seem to suggest[4] that studying tactics and grandmaster games with explanations of the moves can raise your skill level even faster. I felt that by creating chess cards which challenged me to quickly recall certain tactics / openings / game patterns, I could harness the powers of deliberate practice and SRS to skill up more effectively.
Below is an example of one of my chess cards. This one probably took the longest to make out of any of my card types, because I added so many features to it. The front shows a chess board with a particular problem, the right shows the text prompt, and when I flip the card it shows me the solution and the explanation. I also added extra fields to the solution, so I can click through it at up to four different stages (controlled by the buttons).
Unfortunately, I archived these cards a couple of months after I started using them, partly because there were other things I wanted to spend more time on (my undergrad degree, and skilling up in ML & AI safety). I didn’t use them for long enough to determine whether they would have been effective in the long-run, but I suspect the answer is no, because (unlike most of the other card types featured in this post) it takes a very long time to make each of these cards, and there’s no good way to speed this process up. I also don’t think it helped that I was trying to learn something I wasn’t particularly passionate about, that I didn’t think would provide me with skills I’d find useful in the future.
Misc. card features
I’m bundling a few points into this section, because I don’t think any of them on their own are particularly important.
Tags
Anki now supports hierarchical tags. My tag structure has two main trees: “content” and “source”. Here is a snippet of my “content” tree:
The tags[5] show up in the top-left and top-right of the card respectively. For instance, the card below has the tag content::Python::Pandas src::Documentation::Pandas.
Background
There is an Anki add-on which allows you to choose your own background (and change its contrast settings on the homepage and while you’re studying). The plain Anki background is white and quite sharp on the eyes, and also pretty plain and boring. I wanted to use a background that was a bit visually softer, and also looked nicer (but was still minimalist enough to not be distracting). I ended up choosing this greyscale edit of a clip-art picture of some mountains. Below is the raw image (it appears with lower contrast when I’m actually studying cards). Most of the top of the image is plain, which helps make sure the card is clearly visible.
Quote boxes
Lots of my cards consist of quotes and spoilers (discussed above), so I created a nice way of formatting these. It randomises the colour each time you study a card (with the colour chosen randomly from a set of low-contrast colours). The author and source also show up on the bottom-right and in a different font.
Although the aesthetics of a card aren’t the most important part, I’ve found it to be really important, because it affects my motivation to study. Plus, a key lesson from active learning is that the less boring recall is, the more effective it will be!
Automating card creation
As I’ve scaled up my use of Anki, I’ve started to find Anki’s default interface for making cards to be a little slow and inconvenient. If I’m creating a few dozen Anki cards for a particular chapter that I’m reading, or a Jupyter notebook I’m messing around in, I’d prefer to see all the cards at once next to the actual material, so I can judge whether any sections are missing.
To this end, I’ve written Python scripts which take certain types of saved files and convert them into text files, which can be directly imported into Anki. The two main types of files I do this for are:
Notion
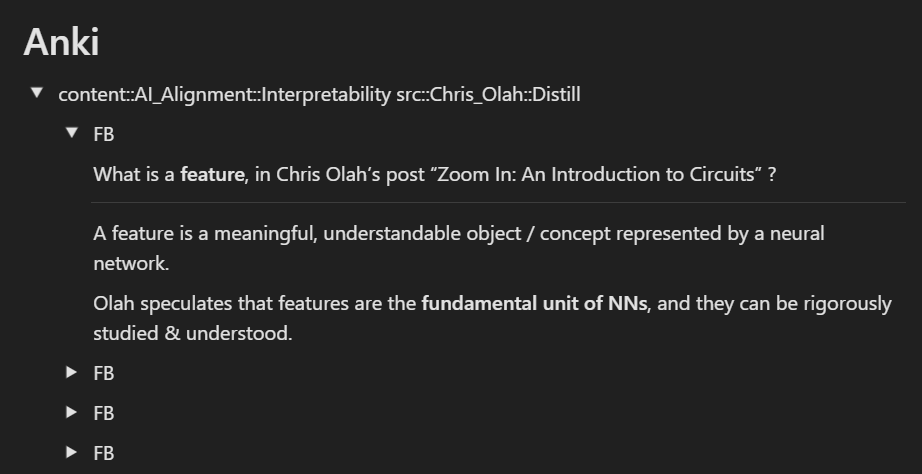
When I’m reading a blog post or other online media, I often use Notion for note-taking. I’ve also developed a specific method for creating Anki cards in a Notion page such that when I export the Notion page as an HTML file, and run some code, it parses the page and creates cards of different types out of the page content.
For a quick summary of how I’ve standardised the format I write my cards in: I put the cards under a title heading called “Anki”, further categorised under toggle headings which show the card tags (usually a single piece of media will have the same tag for all cards I create from it). Each card is contained within another toggle, which shows the card type (for instance, the card type shown below is “FB”, which stands for “front-back”, i.e. just a normal card plus optional hint[6]).
Jupyter
Most of the time when I’m learning a new coding concept or library, I open up a Jupyter notebook to play around in. While I’m doing this, I insert markdown cells between my code cells to represent Anki cards. My Python script parses a notebook file, takes all markdown cells which it detects as Anki cards (it doesn’t include any which starts with “#” because these are seen as section headers, also it doesn’t include any which it detects as just indicating the tag or deck of subsequent cards), and writes these markdown cells into a text file in the form of HTML cards which can be imported directly into Anki. This is extremely useful for creating coding cards with input fields—I use triple curly brackets to indicate a section of a card which will become an input[7].
For example, I’m currently teaching myself deep learning. Recently I went through a PyTorch tutorial about GANs, which was in the form of a Jupyter notebook that I could play around with. The screenshot below shows part of this notebook: there was a cell containing a function which initialised weights in a neural network, I realised I hadn’t seen the nn.init syntax before, so I decided to make a few cards on it, of which this was the first.[8]
I expect these applications to be less useful to most people than the previous ones, because they’re only useful once you’re creating cards at a pretty high frequency already, and if you’re not yet sure whether you will be then it’s probably not worth the time investment. The code is pretty complicated, and I’ve found that I’ve had to tweak it quite a few times to get it to do exactly what I wanted. However I think in the limit of using Anki to the fullest possible extent, some kind of automation is probably essential.
Another important point about doing this: it means I can keep my Anki cards organised in a file system, in context of my notes / actual code. One of the main criticisms of Anki is that it doesn’t really have structure, unlike PKM software like Notion or Roam. Although this objection has been partially addressed by hierarchical tags (which were previously only available as an add-on but are now a standard part of Anki), I still consider it to be somewhat valid, which is why I do use different software for PKM. However, when creating cards in this way, I can at least keep them visible when I decide to review a particular topic. I can scroll through all my Anki cards, and add to them if I think that entire section needs more attention.
How you can customise Anki cards
In this section, I’ll provide a brief summary of how you can create your own custom Anki cards. Please note that you don’t need to be an expert in programming to be able to design these cards. Even a rudimentary knowledge will suffice, and if not you might consider outsourcing the actual design of these cards, once you have a clear idea of what you want out of them. The purpose of this section is mainly to give you an idea of what it is possible to create, so don’t worry if you don’t follow all of the programming bits.
Cards are designed using a combination of CSS, HTML and JavaScript[9]. For a summary of what these languages are and how they work together, I’d recommend checking out the CS50x course[10] from Harvard (this was definitely the best of all the courses I studied last year, which includes my entire third year of undergrad maths!). W3Schools also provides a good intro to each of these languages. At a very high level, these three languages form the backbone of the Internet: HTML for structuring web pages, CSS for styling them, and JavaScript for adding interactivity. This is pretty much the same role they play when creating Anki card templates.
When you design a new Anki card type, there are three sections to fill out: the Front Template (what the card looks like before flipping), the Back Template (after flipping), and Styling (which is just CSS, and applies to both the front and the back). The templates are written in HTML, although you can insert JavaScript and CSS inline the same way you would for any other HTML application (by using <script> and <style> tags).
The only other feature that makes writing Anki cards different from writing normal HTML is how Anki treats fields. A field is just a section of an Anki card that you can fill in (for instance, standard Anki cards have two fields—front and back). When you create a new card type, you can add new fields to it, and indicate those fields in the card type’s HTML by using double curly brackets. When Anki loads the card, it simply replaces the double curly brackets with the html content of your card. You can also add characters #
and / at the start of the curly brackets, to indicate that the following block will only exist if this field isn’t empty (this is useful for things like hints, because I only want the hint block to show up if I’ve written something in it).
As an example of all these features in operation, the code below is from the Front Template and Styling respectively of the “Front-Back with Hint” card type that I’ve created. The Front Template shows the front of the card, then (if the Hint field is non-empty) it shows a block which initially displays the text “click to show hint”. The first line in the Styling section customises the initial appearance of the hint box, and the second line makes the hint initially hidden. Below the {{Hint}} block on the Front Template, there is some JavaScript code (inside the <script> tag) which essentially says “when you click on the hint, set its class to "shown", and we can see from the CSS that this means the background colour changes to white, the trigger (i.e. the “click to show hint” text) vanishes, and the payload (i.e. the actual hint content) appears in its place.
While you edit the source code for cards, you can see what the default card will look like side by side with the code—see the image below for what this looks like in the case of the example above.
Retrospective: what were the most and least successful Anki uses?
Most successful
Coding cards & input fields
As described, I think this is a perfect use-case for Anki. It’s really helped me learn different libraries and features like ML with PyTorch, graphing with Plotly, dataframe manipulation with Pandas, string formatting and regular expressions, etc.Spoiler cards
This is very low-effort to implement, and it’s been especially useful for expanding the scope of Anki cards for me. I also like the fact that the spoilers are flexible—I can also include spoilers in front/back cards, and coding cards with input fields.
Least successful
Chess cards
There was a large up-front cost to create these cards, which didn’t end up being worth it because I stopped learning chess pretty early. This is the only application of Anki that I’m fairly certain was net negative in terms of implementation cost vs benefit from using it. However, I don’t know how much of this was down to choosing a highly complicated Anki card type, or just because I chose to try and learn chess without thinking more about whether I’d have enough time to devote to it, and how useful it would be for me.Automation
I think this will be positive EV when my Anki patterns settle down more, although it probably hasn’t been positive EV yet. I’d estimate that it took around 10-15 hours to write all the code to successfully scrape cards from Notion and Jupyter, and although coding practice is never a bad thing, it’s not a particularly interesting type of coding that I expect will be relevant in my future career. Definitely the best part of automation has been being able to create code cards within Jupyter notebooks, this has made it much easier to mass-produce code cards.
Lessons I hope people take from this
The single most important lesson—Anki (and SRS in general) is way more flexible than people seem to think! With just a bit of coding knowledge, you can create virtually any type of card you can imagine. For me, wanting to make custom cards was a great excuse to learn CSS/JS/HTML, but for people who don’t know those languages, I imagine describing the features you want for a particular card and then outsourcing it might still be a good idea.[11]
To follow on from that point, I’d love to see more people experimenting with different use-cases for Anki, by sharing actual cards and card templates. Lots of the work I’ve described above has had a very high up-front cost, and though I think most of it has been worthwhile overall, sharing it with more people would definitely tip the balance firmly towards the positive. So if people are interested in specific templates of mine, or some of my cards, I’d be very happy to share them. Conversely, if you’re reading this and you already use Anki or other forms of spaced repetition (or would like to in the future), I’d love to hear about your thoughts and experiences in the comments!
- ^
See the minimum information principle in the 20 rules of formatting knowledge article.
- ^
These notes are written in shorthand, so I don’t expect them to actually be useful to many people, but if people would like them I’m happy to make them public.
- ^
As an aside, if you’re thinking of getting a ReMarkable, I’d have mixed feelings over recommending it. I personally find it very useful, but I can imagine this not being the case for everyone. It’s very minimalist and stylish, the writing experience is great, and it uses Kindle-type screens so it’s not sore on your eyes; on the other hand it’s pretty expensive for what you’re getting (a decent iPad would probably be cheaper), and they’ve recently introduced a subscription model which is a bit of a pain.
- ^
Here is an extract from Lars Anders Erikkson’s book Peak: How to Master Almost Anything: “This goes back to...the importance of engaging in purposeful practice instead of mindless repetition without any clear plan for getting better. If you want to improve in chess, you don’t do it by playing chess; you do it with solitary study of the grandmasters’ games.” However, this shouldn’t be taken as solid fact, I’m just including it here to explain how I was thinking about the problem of improving at chess.
- ^
When it comes to designing custom cards, Anki treats tags as just a special kind of field. You refer to it in the same way you refer to any other field, using the double curly brackets: {{Tags}}.
- ^
I’ve abbreviated all my card types to make them easier to type out. FB is front-back, G is general (I use this for code cards), I is image (i.e. image occlusion), Im is the specific image occlusion card type I use for maths cards (which adds a coloured border), and FB*, G* represent those same types with added spoiler options. All my card types support hints and the content / source tags on the top left / top right.
- ^
If you’re curious why, this is the reason: I have cards in my CS deck testing me on Django syntax, and this library uses double curly brackets, so I needed to make it triple so that my Python script wouldn’t get confused when parsing code.
- ^
Admittedly this Python script took a long time to get working, because converting the cell markdown into HTML is harder than just using a single function, there were a bunch of fiddly things I had to work out. I also had to decide on a standardised way of writing cards, e.g. indicating the card type (I do this by adding a single dash between the front and back fields when I’m making front/back cards, and a double dash for image occlusion cards).
- ^
Another reason I was learning these was to try and design my own website.
- ^
Funnily enough, the CS50x material on CSS / HTML / JavaScript was not only used to help me create the syntax for my code cards with input fields, it actually formed the content of some of my first cards!
- ^
If you have a good idea for a type of Anki card, but you’re not sure how to go about creating it, feel free to send me a message—if it seems interesting and worthwhile I might be able to make & share it.
That was fantastic info, thanks. Is there any add-on that you use to organise/add tags? I created a few hundreds of anki cards (without tags) and it seems that I if want to add them now, I have to do it one by one (I can’t for instance select a group of cards and apply to all of them the same tag). Do you happen to know any solution for this?
Thanks! Yeah so there is one add-on I use for tag management. It’s called Search and Replace Tags, basically you can select a bunch of cards in the browser and Ctrl+Alt+Shift+T to change them. When you press that, you get to choose any tag that’s possessed by at least one of the cards you’re selecting, and replace it with any other tag.
There are also built-in Anki features to add, delete, and clear unused tags (to find those, right-click on selected cards in the browser, and hover over “Notes”). I didn’t realise those existed for a long time, was pretty annoyed when I found them! XD
Hope this helps!
Great, that’s exactly what I needed. I bookmarked your post and will use it for sure, thanks for all the effort
I don’t know how often you do that, but if it’s sufficiently frequent, it might be quicker to do with the tool ShareX (free, open source, Windows only), which can do all of the following in the minimum conceivable number of clicks: a) taking the screenshot, b) editing the screenshot in a built-in image editor, c) copying the edited image to your clipboard (or uploading it to an image hoster and copying the URL to your clipboard or something).
This was a great post—I particurarly loved the ‘coding cards’ - would you be able to share the code / plugins that you used to create this? Thanks!
Sorry for forgetting to reply to this at first!
There are 2 different ways I create code cards, one is in Jupyter notebooks and one is the “normal way”, i.e. by using the Anki editor. I’ve just created a GitHub describing the second one:
https://github.com/callummcdougall/anki_templates
Please let me know if there’s anything unclear here!
Thanks very much—thoose templates are working great for me! I wasn’t able to use autohotkey as I’m on a mac but was able to use this plugin to automate the code block/input field creation in a similar way.
Oh wow, I wish I’d come across that plugin previously, that’s awesome! Thanks a bunch (-: