Computational Thread Art
This post describes the iterative process I went through while creating the thread art which you can see featured on my website. This is also crossposted to my personal blog.

Black & White Algorithm
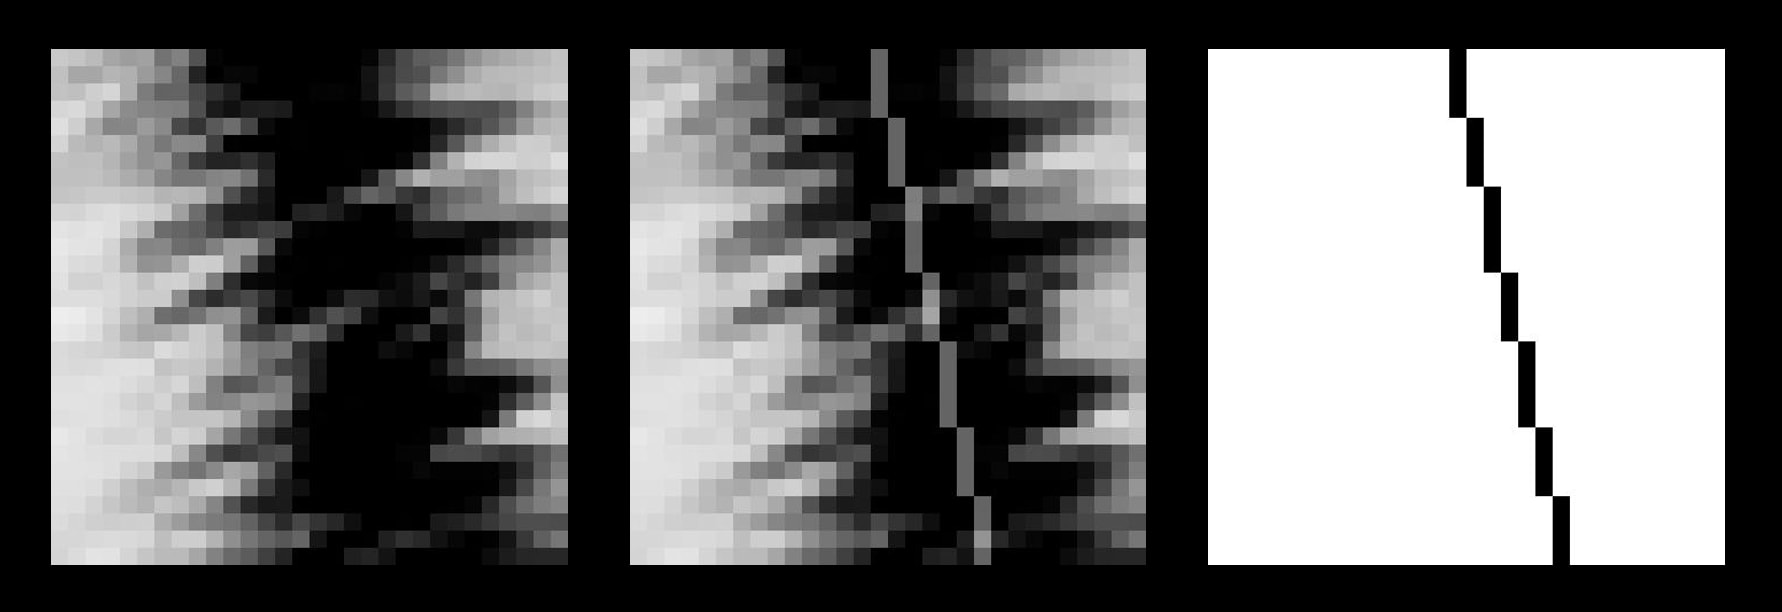
The basic version of the algorithm is pretty straightforward. The image is rescaled so that white equals zero, and black equals one. A bunch of random lines are generated, and the line which goes through the darkest pixels on average (i.e. the highest average value per pixel) is chosen. The value of every pixel along this line is decreased slightly (i.e. the image is made lighter) and the process is repeated, with each new batch of random lines constrained to start where the previous one finishes. Because each line only changes the brightness by a small amount along a very short width, this process gradually builds up gradients, and after a few thousand lines the full image emerges.
The very first image I ever made was of my mum, for her 50th birthday, and it turned out surprisingly well given how basic the algorithm was at that point.
Computational efficiency
Initially, each piece would take about 6 hours to run, because I had no understand of things like computational efficiency. About a month after making my first pieces, I realised that the numpy sum function worked much faster than the built-in Python method, and I could store coordinates in a dictionary rather than recomputing them on the fly, which reduced the time for each piece from 6 hours to just under 10 seconds (I wish I was joking).
Algorithm improvements
There were a few tweaks to this algorithm which made it work slightly better. For example:
Darkness penalty—rather than just drawing the lines which went through the darkest pixels on average, I introduced a penalty for drawing too many lines through an area.
Importance weighting—the penalty on each pixel was scaled by some value between zero and one. This allowed me to improve accuracy in some areas (e.g. facial features) at the expense of less important areas (e.g. the background). I also made this different depending on whether the value of the pixel was positive or negative—this allowed me to specify more complex behaviours like “don’t draw any lines through the whites of the eyes”.
When these tweaks were all combined, each line was minimizing the penalty function:
where are the importance weighting for the positive and negative versions of the image (i.e. for whether the pixel value was positive or negative), are the pixel values (after lines having been drawn), is the size of the darkness penalty (usually between zero and one), and is the weighted length of the line (i.e. the sum of the importance weighting of each pixel).
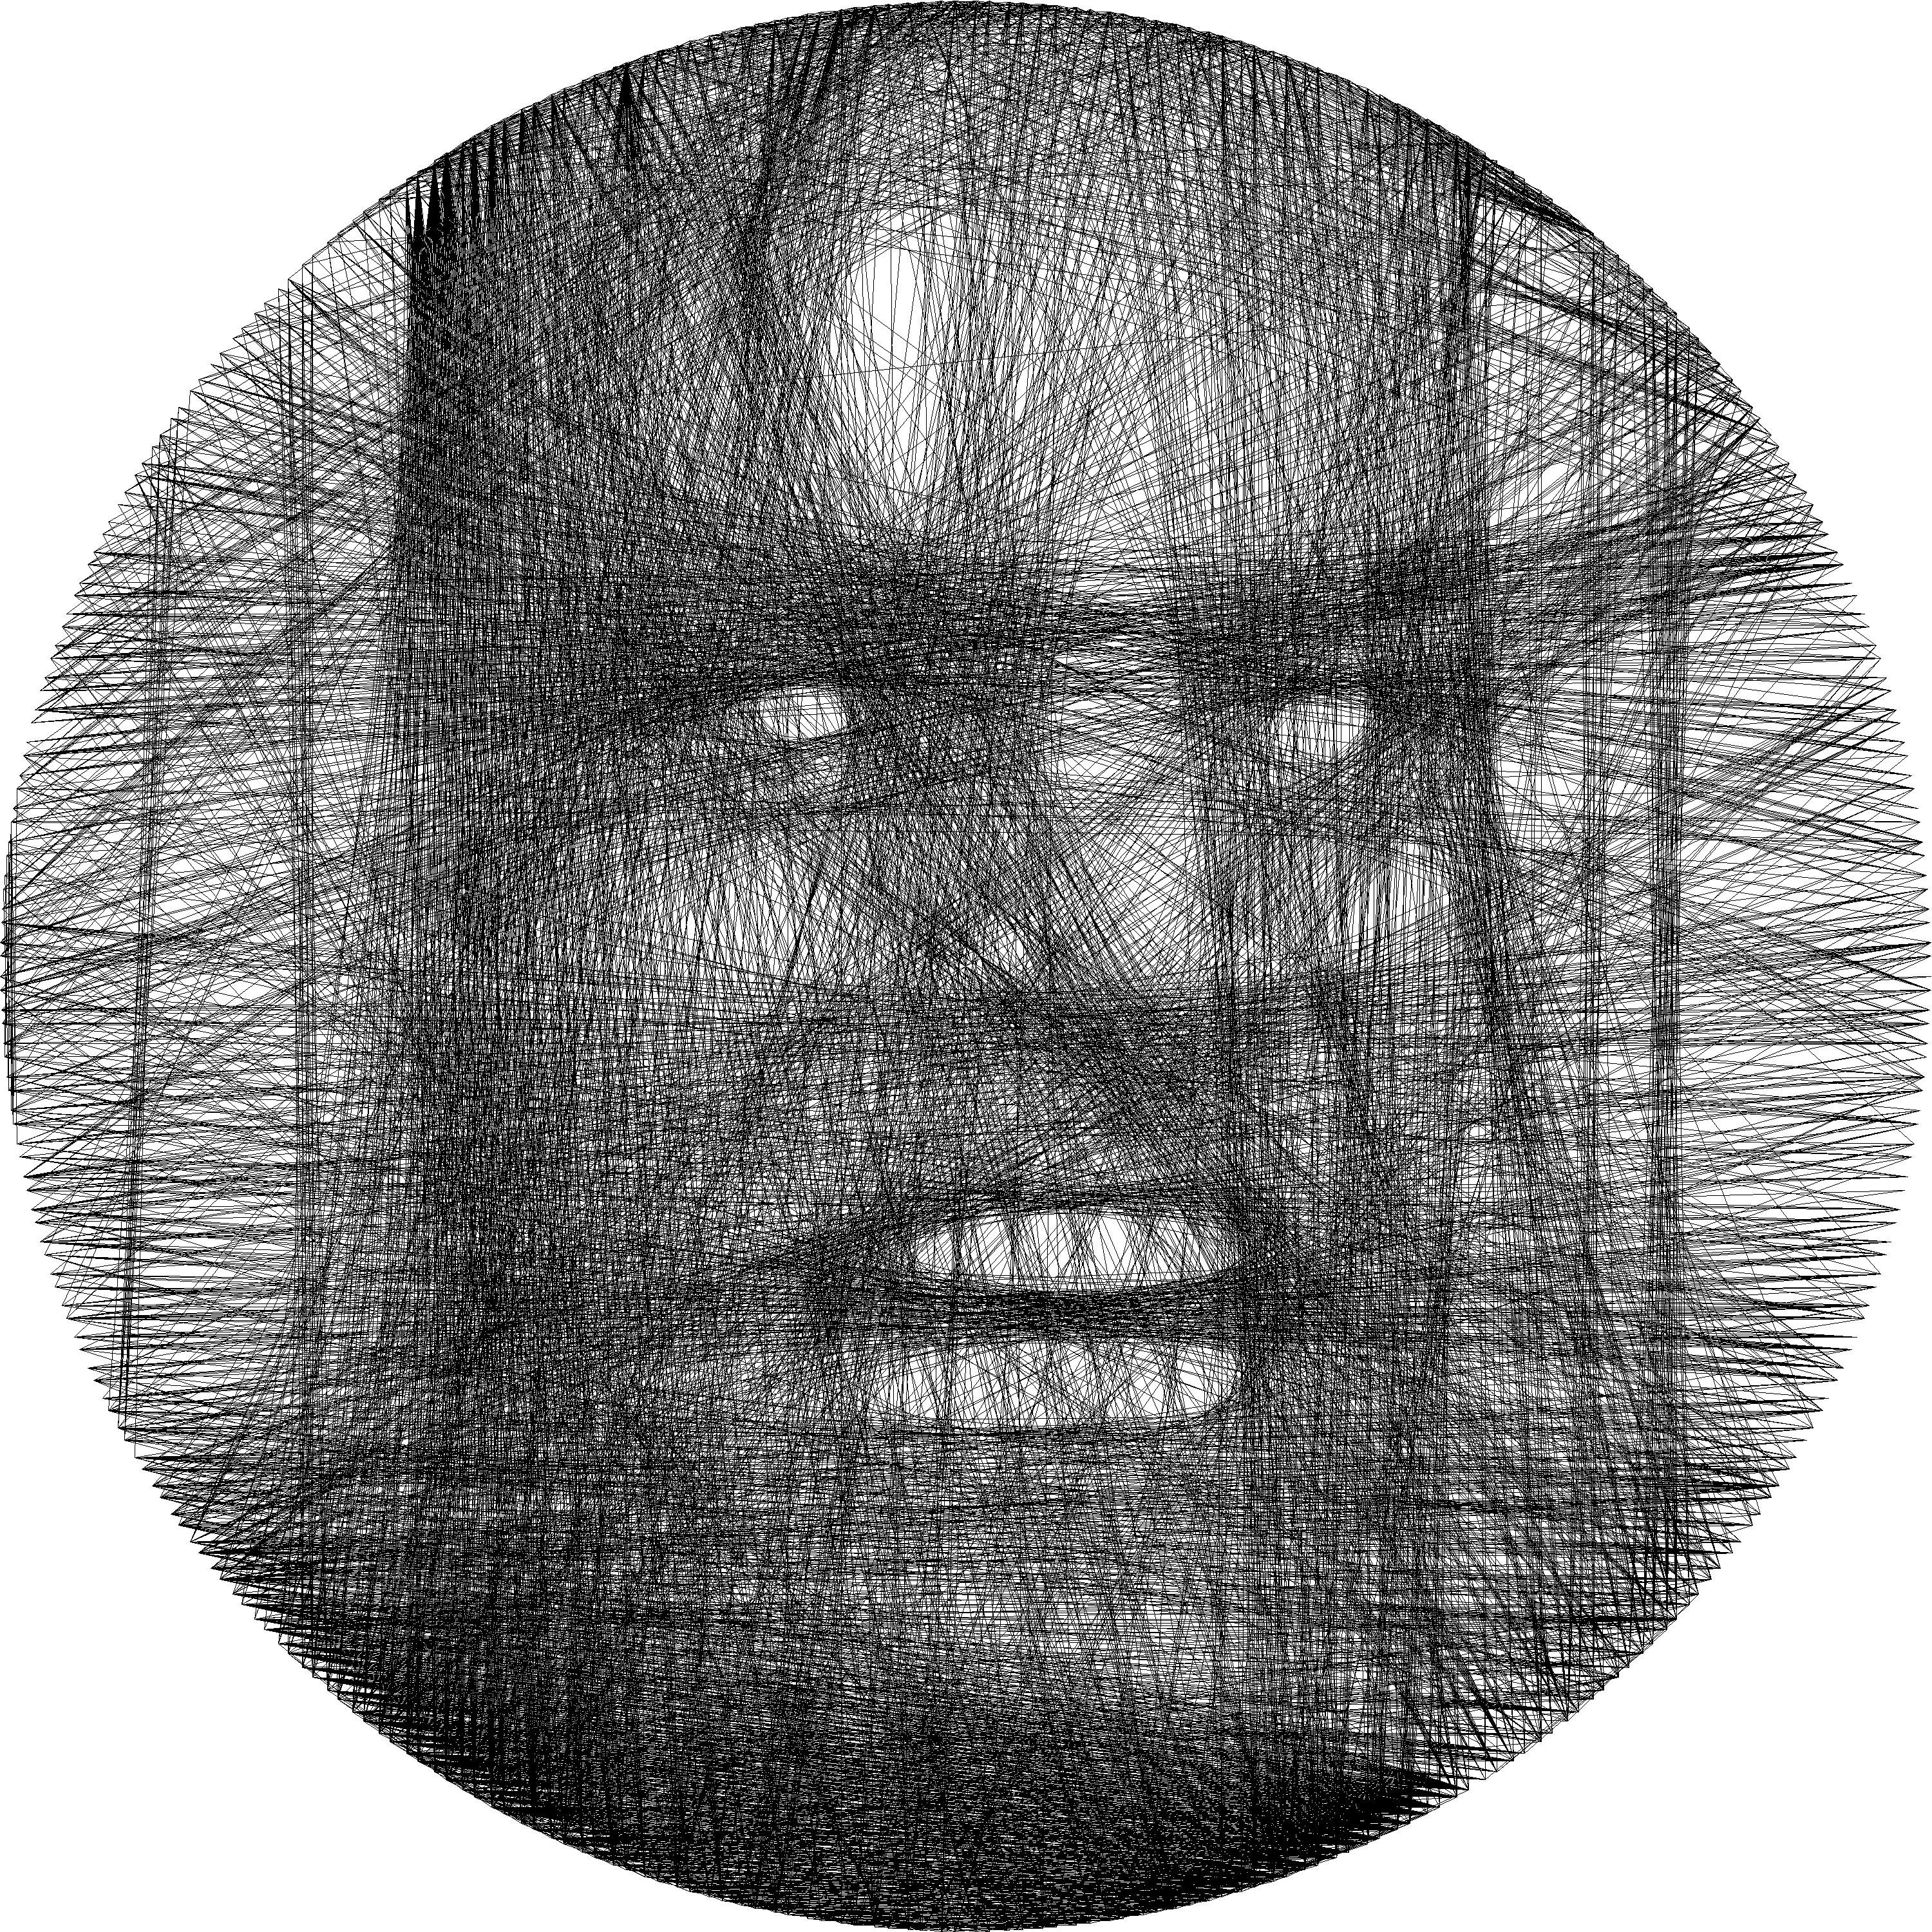
This allowed me to create more complex images. For instance, the following nightmare-fuel image (from the Shining) wouldn’t have been possible without these tweaks, since the simpler version of the algorithm would do things like draw horizontal lines through the image, or draw over the whites of the eyes.
I also adapted this algorithm in super hacky way to create multicoloured images. I could just use editing software to create different versions of black and white images, then generate lines for these images using the standard method, then overlay them. This is how I created the David Bowie image, which is my personal favourite of all the black and white ones:
This was all well and good, but what I really wanted was to create “full colour images”, i.e. ones which blended several colours together & actually looked like the photo it was based on, rather than just using colours in a narrow way.
Full colour images
The algorithm I used for monochrome images basically just worked straight away (although I continued to improve it as I made more images). The algorithm for full-colour images on the other hand took an extremely long time to create. I tried several different methods, such as:
Allowing the lines to be partially transparent, and creating new colors when they overlapped. This rendered some nice-looking images (which I’ve put in the “digital art” section of my site), but unfortunately they weren’t true to reality. Assuming partial transparency will generate images that look nothing like what the thread piece would look like in practice—I learned this the hard way.
Generalizing the notion of “subtracting color” from pixels, but in RGB space rather than having a single pixel. The problem here is that no version of this algorithm would be able to draw black and white lines—one would always strictly dominate the other.
The solution I ended up finding used a process called Floyd-Steinberg dithering. This is the standard way a finite set of colors can be used to visually simulate a smooth gradient. At a high level, it works by rounding each pixel to the closest color (commonly either black or white, e.g. see the example below), pushing the rounding error to adjacent pixels, then moving to the next pixel (ordering by rows, then columns).

If we were just using black and white, the “closest color” would be black if the pixel value is less than 128, and white otherwise. There’s a natural generalization of this algorithm to full-color images: choose the color from your palette which has the smallest Euclidean distance to the pixel, in RGB space.
This leads to a natural strategy for full-color thread art images:
choose some palette which matches the image,
perform this dithering to break the image up into one monochrome image for each colour (where each monochrome image only has 2 values—black if the pixel is that colour in the dithered image, white otherwise),
use the standard monochrome algorithm to generate an image for each of these colour-specific images,
weave these threads together to create a full-colour image.
This worked much better than any of the other methods that I’d tried, and is the method I still use today. Additionally, many of the tweaks to the algorithm I used for monochrome images turned out to be unnecessary, because concerns about leaving whitespace are less important when thread makes up the background and foreground. The only addition to the basic algorithm which was carried over into the new algorithm was the importance weighting.
One other subtlety with the full-colour images was what order to place the threads. Doing all of each colour, one colour at a time, proved not to work, because the colour that was placed last would cover up all colours that came before it. For that reason, I used three general strategies in colour placement:
Split each colour into groups, and layer each group one at a time—e.g. white 1⁄3, orange 1⁄3, red 1⁄3, black 1⁄3, white 2⁄3, …, black 3⁄3.
Add each colour’s threads in reverse order, so the thread which gets added to the image last is the one that the algorithm found first. This is because the first lines discovered by the algorithm are probably the ones that fit the image best, so they should be on top.
Even after splitting the colours into groups, make sure the lighter groups (esp. white) are near the start and the darker groups (esp. black) are near the end, because having lighter threads on top looks extremely jarring for some reason.
This is pretty much the full extent of the algorithm I use now. There are some additional tweaks (e.g. applying a Gaussian blur to each of the colour-specific monochrome images before generating threads for them, so the image is smoother), but unlike for the black and white images, these tweaks didn’t markedly improve the algorithm.
Making the pieces physically
This wasn’t without some missteps—for instance, a failure to understand the effect of radial pressure on 1.5mm MDF:
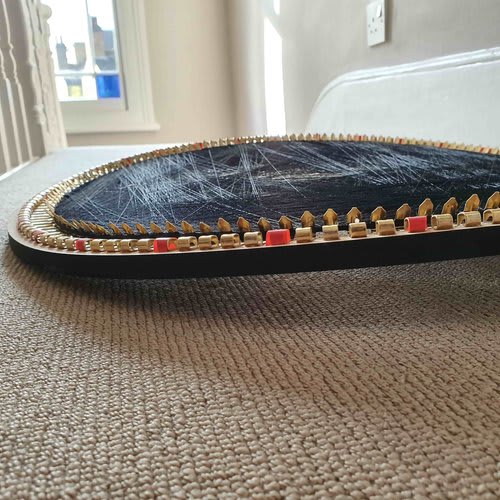
But eventually, I settled on a method which worked pretty well. I’d find bike shops which had bike wheels they were planning to throw out, remove all the spokes, and superglue picture hooks around the circumference. I chose picture hooks rather than nails because (1) supergluing was much faster than hammering them in, and (2) each picture hook actually gave me two separate nodes, so the image accuracy could be the same as what I’d get with double the number of nails. You can see the timeline section of my website for what the creation process looked like.
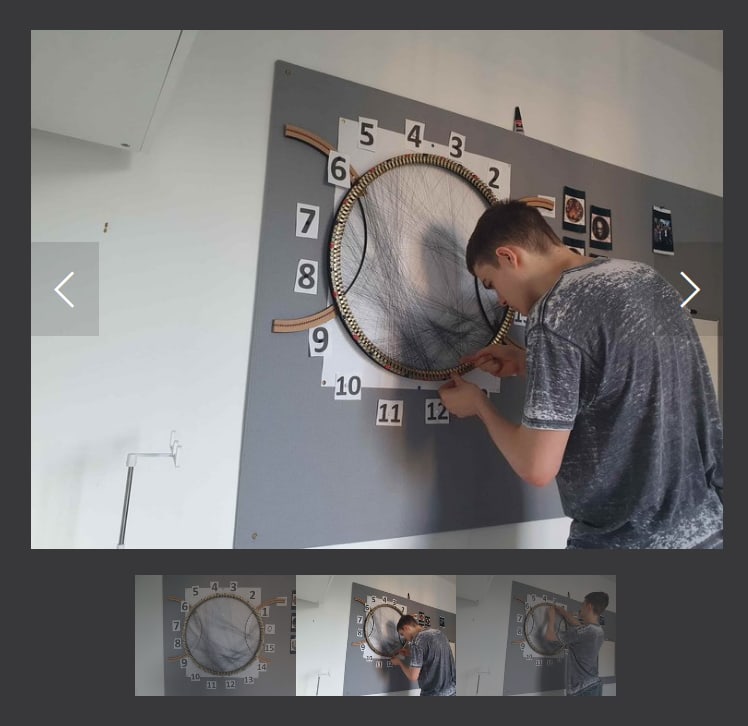
Another interesting track I went down was trying to automate the construction process using a gantry. The first version actually worked, using an extremely hacky contraption of legos and rubber bands to spool out the thread.
Unfortunately I only used this gantry once, as it ended up being pretty impractical. So if anyone in London in the market for a large gantry and a handful of lego blocks, hit me up (-:
Colab
I’ve created a Colab notebook where you can create your own thread art pieces. It includes a few examples (with the base image, and all the parameters). You can find the link here.
Some more images
To conclude, I’ll show a few more breakdowns of images I’ve created, because I like the pretty pictures 🙃
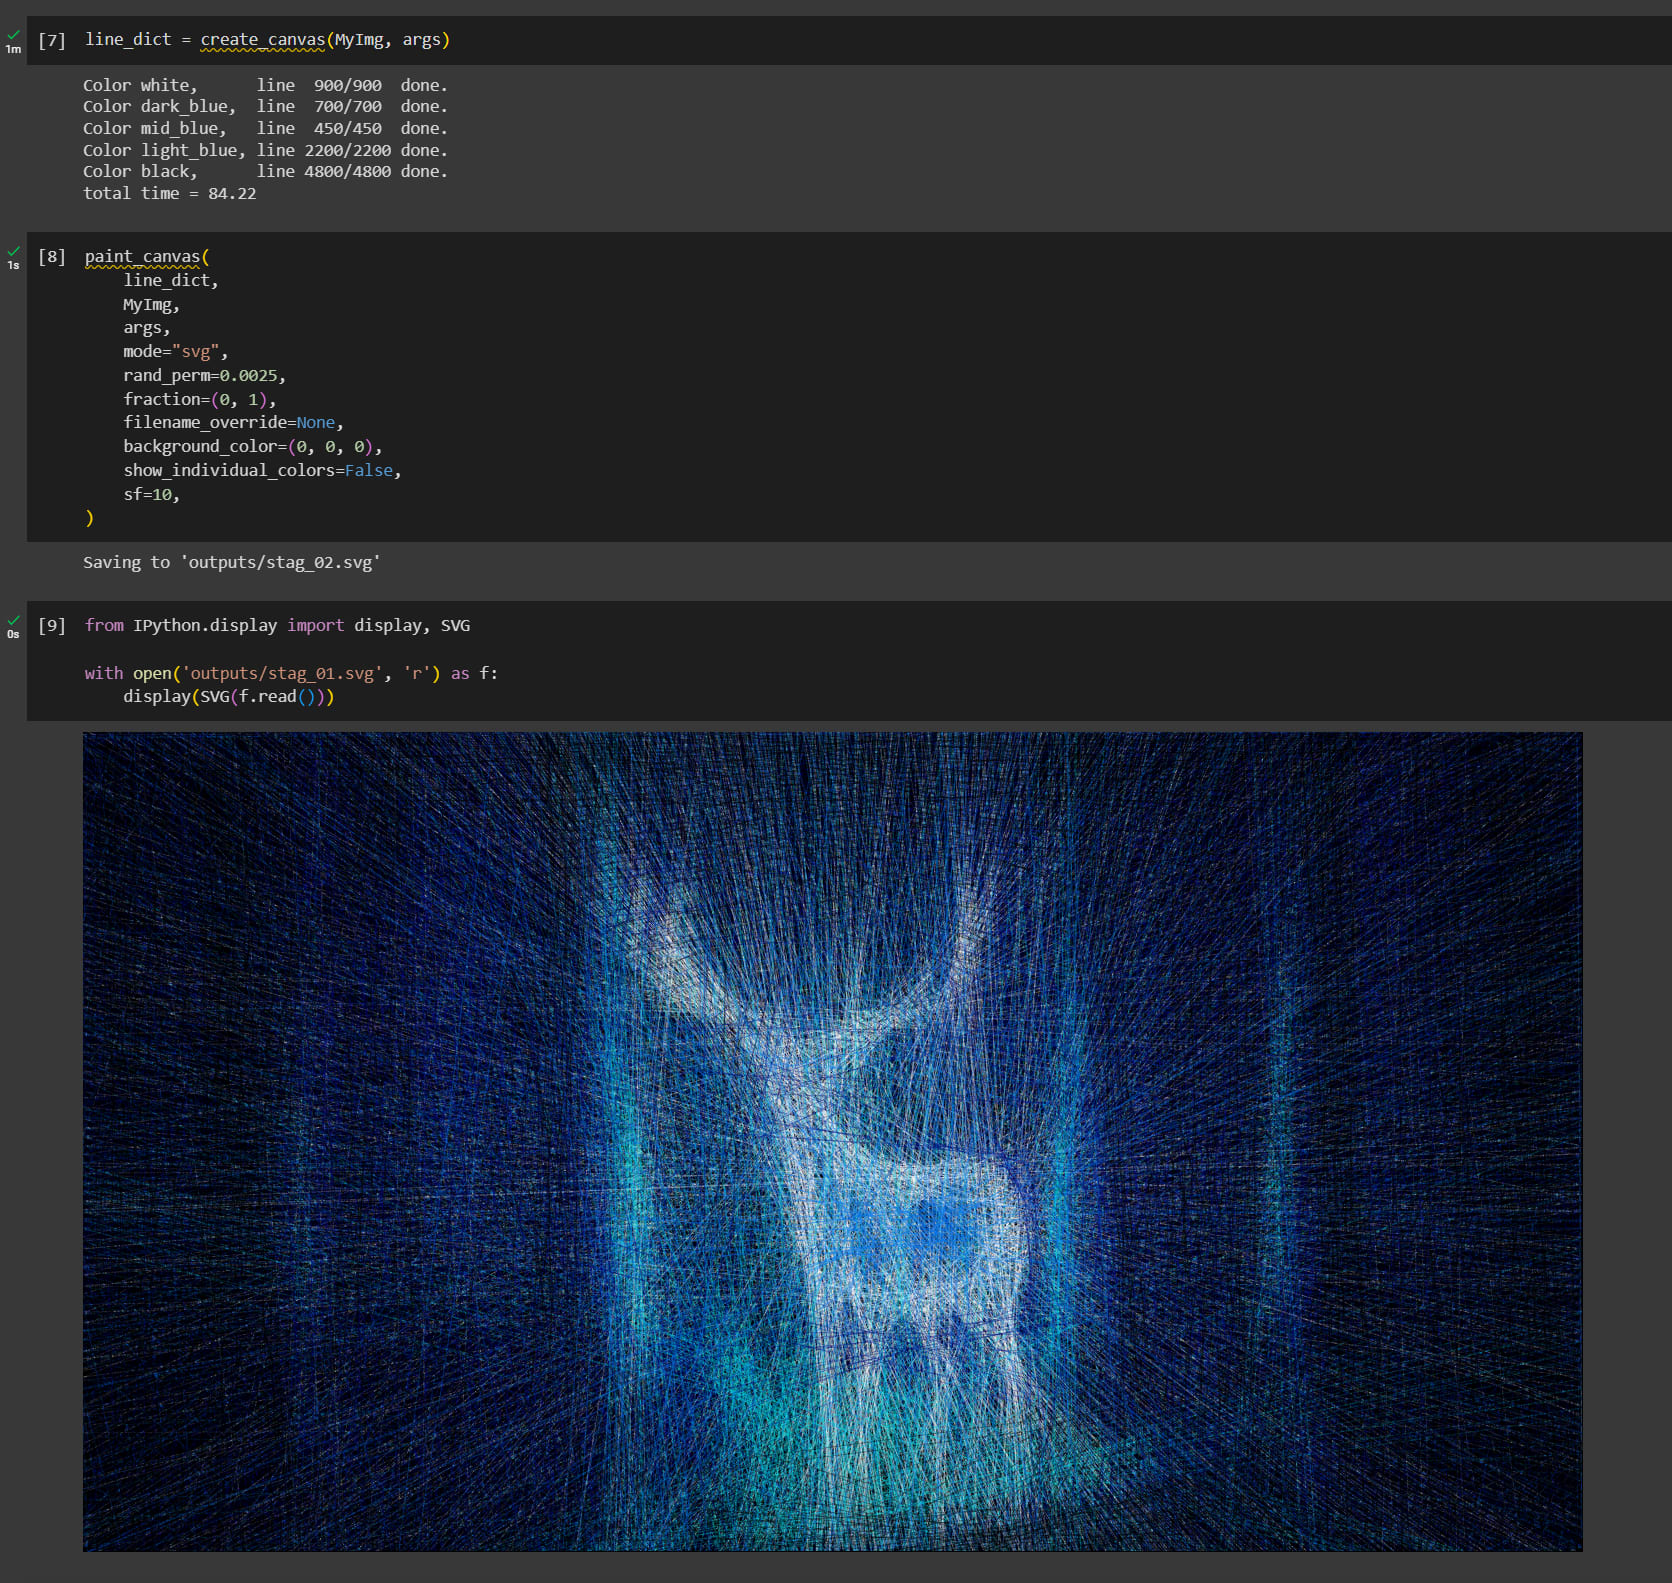
Stag
This is definitely my favourite piece that I’ve made so far. I’ve actually made 4 physical versions of it, including my largest ever piece which which measured 140cm x 80cm (pictured below). I actually made this one on the surface of a Fully standing desk, because they accidentally sent me two.
Duck
Fun fact—this image actually came from the post What Is The True Name of Modularity?, which I co-wrote as part of a modularity sequence with Lucius Bushnaq & Avery Griffin. I had to start a free trial for a stock image site to even get access to that image, and after I did, I thought I may as well get my money’s worth!
I would have expected the effect from occlusion of new lines over old ones to be big, but maybe you include that effect.
How thick do the pictures usually get? Can you post a photo from an angle?
I’m surprised you didn’t do multi-color dithering. Was that because you wanted to weave in phases?
Yep, the occlusion effect is pretty large for colored images, that’s why I use a layering system (e.g. 20% of all white threads, then 20% of all blue, then 20% of black, and cycle through). I go in reverse order, so the ones found first by the algorithm are the last ones to be placed. I also put black on top and white lowest down, cause white on top looks super jarring. The effect is that the In the colab you can play around with the order of the threads. If you reverse the order then the image looks really bad. You can also create gifs of the image forming, and see that the first threads to be added always look like random noise (because at the time the algorithm picks those lines, it’s probably already matched all the important features of that color).
The pieces do get pretty thick, usually about 1cm. Actually, for the gantry (the one shown in the video) I had to intervene to raise its height every hour or so, otherwise the arm would get snagged on the threads.
Multi-color dithering looks cool, I hadn’t come across that before, although I suspect it wouldn’t be much of an improvement (e.g. because you can apply a Gaussian blur to the monochrome images you get from dithering without it really changing the result much).