My guide to lifelogging
I’ve defended the practice of lifelogging as a means of life extension here. In this post I’ll provide a fairly comprehensive guide on how to lifelog. Since lifelogging exists on a spectrum from “taking a picture every so often” to “recording every single detail of your life, in uncompressed HD video along with continuous MRI scans and storage in a nuclear-safe vault” this guide will present two categories for lifelogging, the first for lower cost options and the second higher-cost options. “Cost” here refers not only to the monetary price of buying the equipment, but also the convenience costs of setting up the equipment, storing the data, and perhaps social embarrassment.
Over the last several months I have spent many hours of research to determine the best setups in terms of time and energy required to record my life. I also recommend viewing Mati Roy’s setup.
I intend to update this guide as I learn more, so keep in mind that this post is a work-in-progress.
Lower-cost lifelogging
Archiving social media
The lowest hanging fruit of lifelogging is probably creating a long-term archive of your social media data. The method of archiving your social media data will necessarily depend on the websites you visit, but here are some guides for common websites:
Keylogging
I do not keylog myself, but Mati Roy has informed me that Spyrix works well.
Taking pictures
These days, smartphones generally have high quality cameras, and are much less of a hassle than buying professional equipment.
Storage
Since everything in the lower-cost section here takes up a small amount of space, cloud storage is an appropriate way of storing data for the long-term. Google Drive offers 15 GB of free storage, though I would also suggest storing a local copy of every file along with checking out the subheader on audio and video compression, and the subheader on long-term storage in the section on higher cost lifelogging.
[ETA: Mati Roy comments below that Google Photos offers unlimited free storage for pictures and video.]
Higher-cost lifelogging
Screen recording
The most salient way that I lifelog is by recording everything that happens on my computer screen, along with a full video of my face and room. I achieve this setup by using Open Broadcaster Software (OBS) and record a continuous split-screen between my screen and my USB camera.
I have heard that OBS can be quite annoying to use if you use a laptop, as it turns up the fans and generally uses too much of the CPU. Therefore, I recommend building a computer with a high quality CPU and buying a wide-angle USB camera, along with a microphone to record.
The desktop computer I use is five years old, so I cannot recommend the exact parts I bought at the time. I also do not recommend using the USB camera that I bought, as it does not have a wide enough angle for my tastes. Instead, I recommend browsing the subreddits /r/buildapc and /r/buildapcforme until you have a decent idea of what goes into building a computer.
I would estimate the minimum cost of a desktop computer that can reliably run OBS without problems at around $500, if you know what you are doing. But a price tag of at least $750 may be better if you don’t want to run into issues later. This benchmarking site, and this one are useful for determining low-cost high-quality CPUs. At the moment I suggest getting around a $200 to $300 newest generation AMD Ryzen CPU.
Nighttime recording
The value of recording yourself sleep is arguable, so I do not suggest this to everyone. My own justification was to have a sense of completeness in my lifelogging, and feel like I wasn’t ever missing a moment.
That said, I purchased this USB infrared camera to record myself at night, and it works well. It also functions as a day-time camera, automatically switching to infrared when the lights go out, making it suitable as an all-day recording camera. I also purchased this fitness watch to track my sleep, though this aspect is obviously not necessary.
Just as in the above section, I use OBS to facilitate the recording. It’s worth understanding how profiles and scene collections work in OBS so that you can simplify your setup.
When I’m not at my desktop
Recording at my desktop is nice, since I can use OBS, but when I’m on-the-go I have two main ways of recording, using audio and video.
Audio
The first method is audio recording using my phone. I have an iPhone at the moment, and therefore I recommend Android users to look at Mati Roy’s advice. I purchased this omnidirectional lavalier microphone along with this lightning-to-headphone jack connector, and am generally pleased with the quality.
I use the app Dictaphone, but I’m not confident at all that this app is the best. It was simply the first thing I looked at for iOS.
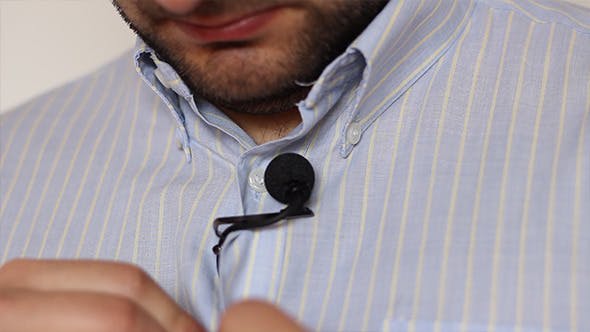
The lavalier microphone connects to my shirt, sort of like in this picture, and I don’t generally have to think about it much when I’m on the go. Of course, I urge potential lifeloggers to make sure that they have the consent of all parties before recording people on-the-go.
In order to save phone battery, I also purchased this voice recorder, which has surprisingly long battery life and acceptable storage. However, I mostly don’t use the voice recorder anymore since I have switched to mainly recording video while I’m on-the-go, as I explain in the next section.
Video
If you aren’t satisfied with recording audio continuously on-the-go, you can switch to using video. I experimented with purchasing an action camera (ie. what Go Pros are) for this purpose, but then soon realized that there was a better alternative.
I now recommend lifeloggers purchase a body camera, of the type used by police. Here some of the pros and cons of body cams compared to action cameras:
Pros:
They generally have much longer battery life (very important)
Most have native infrared recording so you can record at night
Body cams are built to allow you to easily clip it onto clothing (this makes continuous recording less awkward)
They tolerate shock damage, such as dropping the camera, more than many action cameras
Cons:
The video quality is lower
Fewer features are available
There are fewer online resources for operating body cams
After substantial research I decided to buy this body camera. The primary reason I went with it over other cameras was because it had a detachable battery (with an extra), and detachable storage (but you must purchase the SD card on your own). The main downside is that the lens angle is only 140 degrees compared to 170 in some other body cams.
The body cam is well-built and is much lighter in weight than you might expect. It connects easily to my computer via a USB cable that enables me to transfer the video files to long-term storage.
To minimize storage costs, I record in 480p and compress all my files once I have transferred them to my computer (see next section). The body cam allows an option for on-board storage during recording, but I don’t use it because it seems to work by simply halving the bitrate of the video without anything intelligent involved. A similar thing seems to happens when you turn on the option for pre-recording for some reason.
On a full charge I can get over 5 hours for each battery, and it is easy to replace the battery when the body cam dies. With a 128 GB SD card it can hold about 68 hours of continuous 480p quality video before it runs out of space.
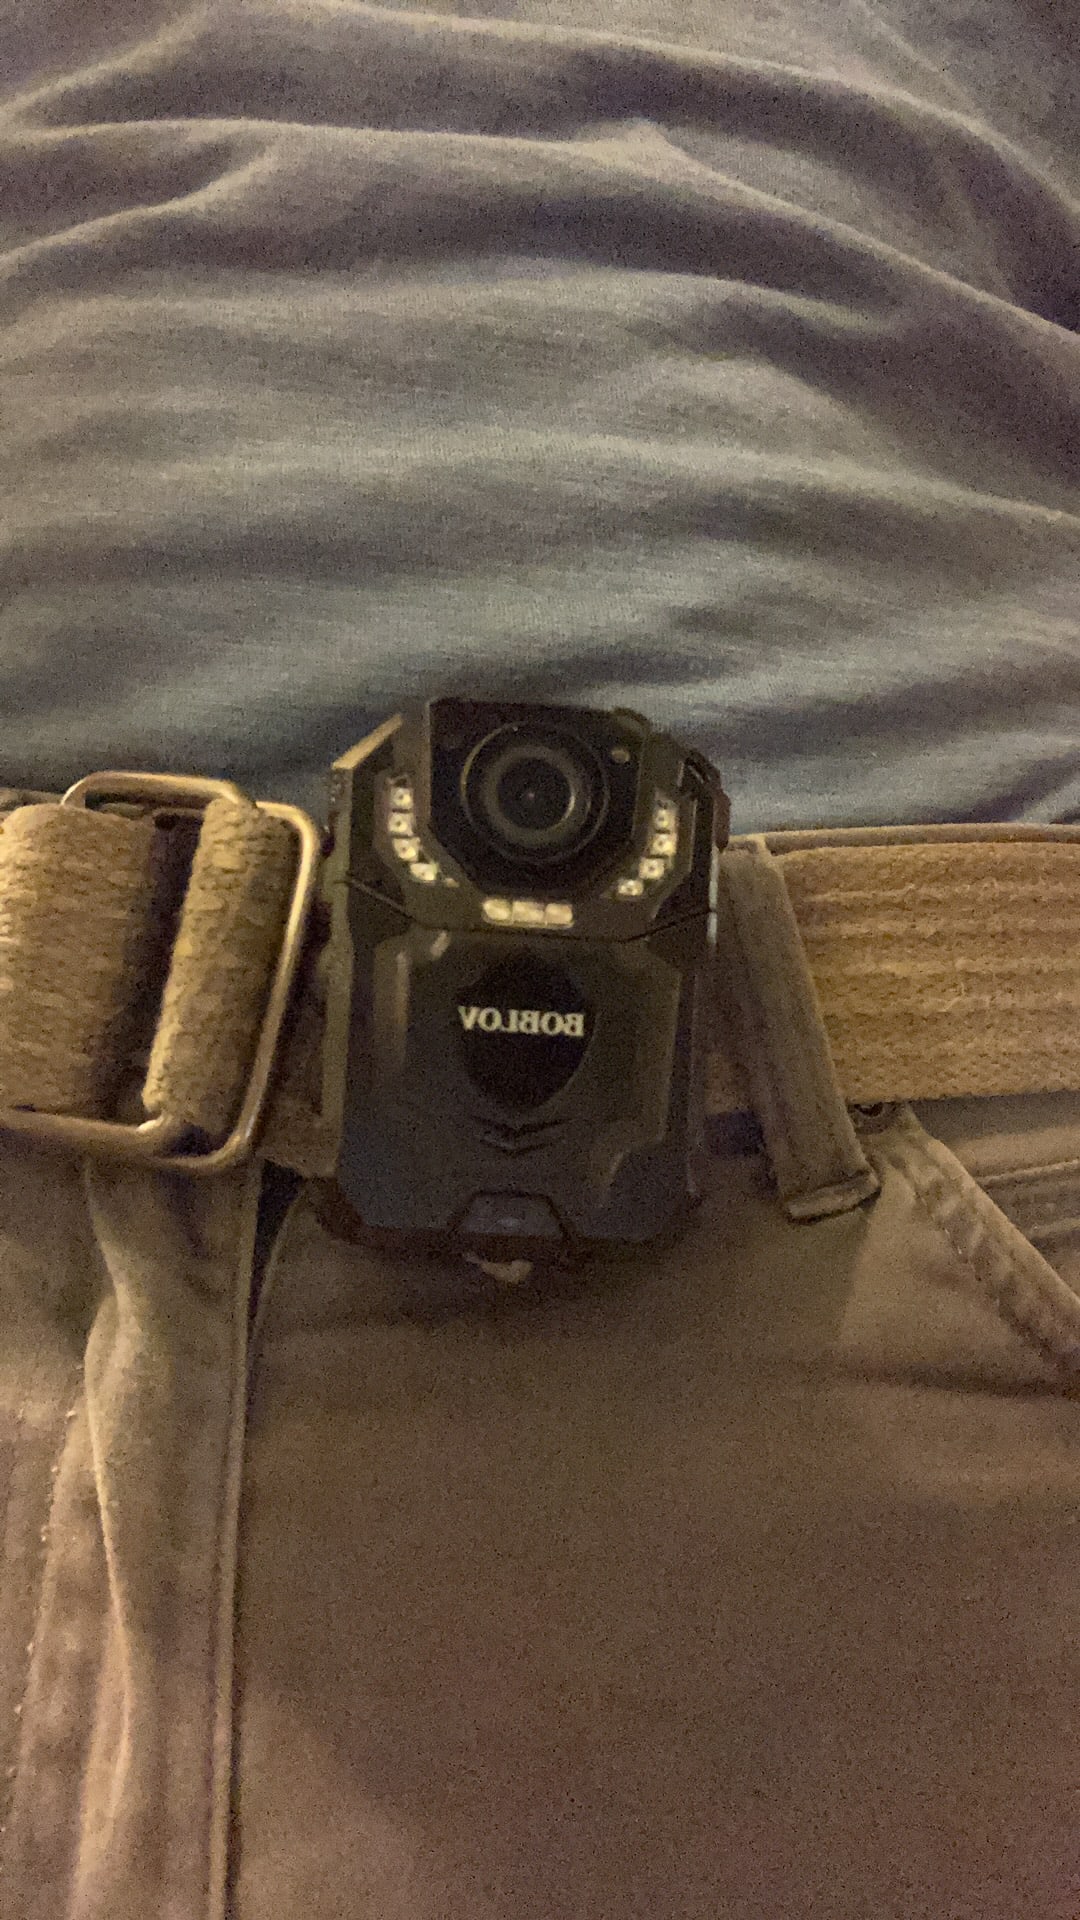
I have tried various ways of connecting it to my body, and the thing that seems to work the best is simply connecting the body cam to my pants, or belt, as shown in the image below. Unfortunately, you do have to tuck in your shirt or else the body cam won’t be able to see much. On the bright side, this means that if you want to hide that you are wearing a body cam, all you have to do is make sure your shirt covers it.
More downsides of keeping it on your pants include the fact that it doesn’t record people’s faces if you are talking to someone close by, and it doesn’t record very well when you are sitting down at a table or sitting more generally.
See this Google Drive video for a sample of the post-compression quality using the body cam. I think that Google Drive compresses video uploaded there, so make sure to download it to see the real quality, as it’s only 21.9 MB.
Audio and video compression
Video takes up a LOT of storage unless you compress. Audio is similar, though less extreme. Therefore, before transferring my files into long-term storage, I always compress them into something of acceptable size.
I use FFmpeg to compress my media files, which works well on Ubuntu, but I have not tried it out on other operating systems. To compress my videos I run this bash script,
#!/usr/bin/env bash

for i in *.MOV;
  do name=`echo "$i" | cut -d'.' -f1`
  echo "$name"
  ffmpeg -i "$i" -c:v libx264 -preset veryslow -crf 24 -strict -2 "${name}.mp4"
done

rm *.MOV
The two most important things to understand about the script above are the options
-preset veryslow
and
-crf 24
These options determine the quality and size of the video. I recommend choosing quality and size depending on your own tolerance for storage costs (see the section on long-term storage below). The the FFmpeg documentation explains these options in more detail,
A preset is a collection of options that will provide a certain encoding speed to compression ratio. A slower preset will provide better compression (compression is quality per filesize). This means that, for example, if you target a certain file size or constant bit rate, you will achieve better quality with a slower preset. Similarly, for constant quality encoding, you will simply save bitrate by choosing a slower preset.
Use the slowest preset that you have patience for. The available presets in descending order of speed are ultrafast, superfast, veryfast, faster, fast, medium – default preset, slow, slower, veryslow.
[...]
The range of the CRF scale is 0–51, where 0 is lossless, 23 is the default, and 51 is worst quality possible. A lower value generally leads to higher quality, and a subjectively sane range is 17–28. Consider 17 or 18 to be visually lossless or nearly so; it should look the same or nearly the same as the input but it isn’t technically lossless.
The range is exponential, so increasing the CRF value +6 results in roughly half the bitrate / file size, while −6 leads to roughly twice the bitrate.
For audio, I use this command,
find -name "*.WAV" -exec ffmpeg -i {} -acodec libmp3lame -qscale:a 5 -ab 128k {}.mp3 \;Long-term storage
Note: Since early 2021, I started using cloud storage services, since the cost of backing up on blu-ray discs became substantial. I personally now recommend Googling around for cheap long-term archive storage options from the major cloud providers.
For large amounts of short-term storage, you can visit the website diskprices.com to view the cheapest storage available to consumers. Personally, I recommend getting SSD storage as opposed to HDD storage for short-term use, as even though it is more expensive, it is also much faster.
However, since both SSDs and HDDs are not built to store data for decades without corruption, the best option at the moment is likely burning data onto blu ray discs. You can find cases of 50 blu ray discs that hold 22.5 GB for between $20 to $25. However, the real costs of long-term storage will be higher than this for two reasons,
For the long-term, ideally you should keep at least two copies of every file, and you should store them in separate locations.
Data burning often fails with a rate of between 10 to 20 percent, which means that your true cost estimates should take into account the fact that many discs will be useless.
I purchased this blu-ray burner, which works acceptably but I’m unsure whether it is the best option. I also purchased a few of these cases which can hold a lot of discs quite cheaply.
I suggest taking a look at a list of best practices for long-term storage on blu-ray discs as compiled by Brian Tomasik. Like him, I am not an expert either, so take this advice with a grain of salt.
2021-07-11 update: here’s my new lifelogging guide
Awesome, thanks for writing this!
Also, Google Photo offers unlimited photo and video storage. (EtA: Actually, not anymore)
Other pros of some body cams: goes underwater without a casing blocking the mic (I think). Other cons of some body cams: has the time and police ID on the video, less gears available for ways to strap the cam to things (than GoPro at least).
For OBS, I recommend going in Settings > Advanced > Recording > “Automatically remux to mp4” because a) most video players can’t read .flv, and b) if you record directly in .mp4 and OBS crashes or your hard drive gets full, you will lose the whole recording. (source: https://obsproject.com/forum/threads/recording-in-mp4-settings.101382/)
For more tips on lifelogging as life extension, I invite you to join: https://www.facebook.com/groups/LifeloggingAsLifeExtension
I haven’t tried it, but I don’t think it can go underwater. It is built to be water resistant but I’m not confident it can be completely submerged. Therefore, if you are a frequent snorkeler, I recommend getting an action camera.
I think this will no longer be true soon.
“Important: Starting June 1, 2021, photos and videos backed up in High quality will start to count towards your Google Account storage.”
https://support.google.com/photos/answer/6220791?visit_id=637571971979049227-1585044019&p=drive_photo_size&hl=en&rd=1#zippy=%2Chigh-quality%2Coriginal-quality%2Cexpress-backup
I would add that lifelogging should include not only passive recording, but also active uploading of data in the form of memoirs, dairy, drawings, and creation of objects of art.
Neat. I too have been logging for quite sometime now, the biggest cost initially for me was with Storage, but I’ve found some neat ways to handle the storage issues: 1) If you are on your desktop, create a private stream on YouTube using OBS—obviously helps you save diskspace while also helping you maintain privacy and providing unlimited storage as these are basically just youtube videos that are kept private. 2) If you own a tripod, you can record your sleep patterns and do the same by mounting your smartphone on it and hooking it up to your PC and streaming it to YouTube privately. 3) Obviously Go Pro is the best all-purpose recording device as Mati says, but I am not much of an underwater person, so I use my smartphone for everything, which I feel is the second best as you can use the YouTube’s go live feature to record yourself with private mode on.
Apart from that I would say, always carry a small pocket notebook and a pen incase your phone’s battery dies on you or something like that. Also write everyday, blog! (Not Twitter), because reconstructing the thought process from an elaborate medium is much much easier than Twitter. If it is you who is going to revisit it later, you don’t just want to sympathize, you want to empathize; and pithy sentences(280 chars) are bad for that. I’ve tried. I realized it after reading Montaigne’s Essays and a nice little book called the Diary of a Nobody by guy named George Grossmith. There is so much that can be extracted from that as opposed to Meditations where you can feel for Marcus but forget it so easily that you never get to ponder about what would Marcus be doing right now, which can be done with Montaigne or the other guy.
Hi. I’m currently a teenager and I unknowingly have been “life logging” with OBS Studio since last August. I thought of this idea independently by myself lol. I have only discovered that other people do this and it is called “life logging” today. I decided to search up if other people do this and I’m glad to find out that I’m not the only one. The reason for this is because I ran out of local storage on my PC last week (I have a 1TB SATA SSD. Currently 1 hour of video is like 1GB so I have like 760 hours of video) and I have been unable to record for the past week. My dad has known I’ve been doing this for a couple months and he thinks I’m mentally ill and says I should go see a shrink. He originally blocked OBS Studio when he first found out, but now he doesn’t really care. My current problem is I am unable to buy more storage. I’m still unable to ask my dad to buy me, because he’ll obvious refuse and it will remind him of my “problem”. He thinks it’s a problem. Anyways I’m kinda stuck with how to proceed. Should I show him that other people do this and try to convince him that I’m not mentally ill?
I’m happy to know that more people are trying out lifelogging.
While you could try showing him that others engage in this hobby, I’m not sure it would be effective in changing his perspective. I think a stronger argument is that lifelogging is harmless, as long as you’re not recording people without their consent. The only real considerations are the convenience and storage costs, which you can independently manage without independent support. Data storage is cheap these days, and easily affordable to someone with a part-time job.
Great starting point for the technical side, thanks. I’d be very keen on insights about navigating the social space while life-logging.